Winchester Reloading Tools
From October of 1874, until around 1915, Winchester made a variety of Reloading tools. There were also bullet molds just for these tools. You could buy the reloading tools individually, or as a set with mold and tool in the same box.
Repeating rifles require a loaded cartridge of a specific length. Otherwise, the cartridge would not feed through the action. Single shot rifles were different. You could put any bullet in the cartridge you wanted. Winchester made a variety of bullet molds. Standard molds for the Repeating Rifles and different weight bullets for the Single Shot Rifles.
In the Winchester Catalogs, the lists of reloading tools and centerfire cartridges are the same. In other words, "If they made the cartridge, they made reloading tools for it." This may not be 100% true in later years. There may be some odd contract cartridges that no tools were made for.
Sometime after 1915, their cartridge production continued to expand, but no more reloading tools were made.
I am not sure why the Reloading tools were discontinued. Ideal offered fierce competition. There was also a general lack of knowledge about smokeless powder. It is possible that guns were blowing up and injuring people. It may be that Ideal just beat them out on price and quality.
For some reason, Winchester gave up on Reloading tools, after about 36 years of production.
Some of these patent tools were only made for a short time. Often, a better design or patent became available. Winchester kept adopting new ideas so they could compete with the other companies.
All these tools worked very well for their intended purpose. Like anything else, you could mess them up or break them. Used properly, they will last for years.
These tools were made primarily in the black powder era. The big exception is the Model 1894 tool set. They were made for Smokeless AND Black Powder cartridges. I will give more details in the 1894 tool section below.
I am going through each Winchester Reloading tool on this page. I will also have an individual page for each tool. This page puts the tools in the order of their production and is an introduction to these interesting tools. I also describe how you can use them. The individual page for each tool will show more variations.
The Winchester Model 1874 Reloading Tool
The first reloading tool by Winchester came from Oliver Winchester's son, William Wirt Winchester.
(June 22, 1837 to March 7, 1881. He was the Treasurer of The Winchester Repeating Arms Company. I have never seen any mention of him as a Mechanical Designer or Shooter.
This is a remarkable tool for this point in time. No one else had anything like it.
The Henry Rifle and all but a few of the last Model 1866 rifles were rimfire, using the 44 Henry Cartridge. These rimfires could not be reloaded. No Reloading Tool was necessary or possible.
Sometime before the Model 1873 was introduced, Winchester started experimenting with centerfire cartridges for their lever action rifles. The result was the Model 1873 Rifle and the 44-40 centerfire cartridge. A New Rifle, a New cartridge and a New Reloading Tool. This was a remarkable combination of ideas that propelled Winchester forward. I am amazed that they sold around 720,000 of these rifles.
There is a great article in the "Remington Society of America", Journal, from the third quarter of 2000. (By Lou Behling) It is all about American primers. Winchester was a little late getting a patent centerfire primer. They seemed to have used Milbank's primer until July 14, 1874, when Oliver Winchester finally got his own primer patent, No. 152936. This primer has remained essentially the same to the present day.
Winchester had a great idea here. They could market the Rifle, Cartridges, Primers, Bullets and a neat new Reloading Tool Set to help sell all of it.
So far, only 44-40 caliber 1874 tools have shown up.
These tools are finished much better than the 1875 tool. There was a financial panic in the 1870's and Winchester may have cut corners on the next tool, to save money.
Would they sell? Winchester gave it a cautious try and it worked..

_JPG.jpg)
I have never had one of these tools, so right now, I am stuck with just a few pictures sent by friends. If you have one of these in nice condition, please sent 4 or 5 pictures, with different views, and I will post them here. Some nice closeups with more detail would be welcome. In the original box, even better!
Above left, you can see the original patent drawing.
This is a neat little tool. They are primarily painted gold. There are some that are painted black. The black ones are considered original. I did see one painted red. It was on a blog that no longer exists and I did not save the photo. If you have that tool, or an original 1874 tool in a caliber other than 44-40, we would love to see pictures.
I always display reloading tools at gun shows. I constantly have people ask, "WHAT THE HECK ARE THESE? RIVETERS?" Then they say; "A Reloading Tool? Well how does it WORK?" Sadly, most people have lost touch with the past.
I will try to fix the lack of knowledge here. Check out the photo below.
Basically this is a big set of Pliers, that performs several different functions, all in one tool. If you saved up your money and bought the rifle of your dreams, you would naturally want to get everything you needed to shoot it. A serious Rifleman would want the best of everything. This tool was the Best available at the time. A Cutting Edge product! Cartridge and Reloading Tool development was in it's infancy in 1874.
Normally, you will have cartridges for a specific rifle, fired in that rifle only. You may run into trouble if you use the cases in a different rifle using these tools! The sizes of chambers vary a lot.
A collector may have many 44-40 rifles. A Rifleman of the past probably only had one.
When you fire a brass, Black Powder cartridge, it forms to the chamber, and shrinks back a little. This is generally called "Fire Forming" by experienced Riflemen.
You should be able to reload the cartridges over and over without full length resizing.
_JPG.jpg)
1
2
3
4
5
No. 1. This is the de-capping pin. After you have fired your cartridge, you have an empty case with a spent primer. The primer is a press fit and you get it out with this pin. Slide the empty case onto this pin and make certain the pin goes in the flash hole. Close the handles and squeeze gently. The primer will pop out. Then clean the cartridge case and primer hole.
No. 2. Once the cartridge case is clean and dry, slide the cartridge case on to this pin. Place a new primer on the primer hole. Press the primer in. Try to use the same pressure each time for accuracy. The primer must go below or flush with the base of the cartridge.
No. 3. This area is where the cartridge is finished. I call this the "Bullet Seating Chamber" because that is what it does. When you push the cartridge all the way into this chamber, you do two things. You seat the bullet to a consistent depth and crimp the bullet in place. This tool does not full length resize the case like modern reloading dies.
Seating and crimping is critical for a repeating rifle like the Model 1873 Winchester. With the cartridges stacked up in the tubular magazine, the cartridges bounce hard with each shot. If the bullet moves, accuracy goes to heck.
(a) Determine the proper Black Powder charge you need to fill the cartridge case and leave room for the bullet. I place a cardboard wad over the powder to hold it in place and protect the base of the bullet. This is not absolutely necessary, but is considered good for accuracy.
(b) Start the lubricated lead bullet into the cartridge case. It may go in easily. It may be tight. If it is the correct bullet, it should start in the case. Don't tear or damage the base of the bullet. If you do, toss that bullet and get another one.
(c) Turn the tool upside down and open the handle. Push the cartridge with bullet up into the seating chamber. Upside down because you don't want the bullet falling out. Powder either. Close the handle while holding the cartridge in place. Squeeze the handles together. This will push the bullet all the way in the cartridge to a consistent depth. You will feel more resistance in the last 1/16th of an inch. This last push crimps the bullet in place.
No. 4. This is the cartridge extractor. Once the Cartridge is pressed all the way into the seating chamber, it may stick a little. You are NOT full length sizing the cartridge case. You just seated the bullet and crimped it. Open the handle all the way and that will activate the extractor. The cartridge should pop out easily. Wipe the cartridge case off and you have a finished, reloaded cartridge. Wipe out the inside of the seating chamber as needed. Grease can build up in there. You will get better results if it is clean.
No. 5. This top handle is not strong on this particular tool. I put the 5 over what is probably the weakest area. The handle can bend or break if you use too much pressure.
This is a neat little tool, as I said before. The de-capping pin is built in and cannot be lost. It is a complete, one piece unit. Later tools had a de-capping pin that could fall out and be lost.
If you are NOT mechanically minded, you should not try this. I had a brother in law that could not assemble a bicycle or hang a shelf. He had no business reloading.
You can use these tools to reload cartridges with smokeless powder. You MUST read the manuals about powder types and powder weight. Lead bullets need light loads.
My Great Uncle blew a Model 1873 firing pin into his brain, using either his own smokeless reloads, or cartridges someone gave him. Care must be taken with Smokeless Powder.
You can not get in trouble with Black Powder unless your gun is not safe. You simply can't get enough powder in there to cause trouble, unless you firearm is not sound. When in doubt, have a gunsmith check it out.
The Winchester Model 1875 Reloading Tool
You will not find a patent for this tool. It is different from the 1874 tool. Winchester seemed to think it was covered by the October 20, 1874 patent. This date was carved into the wood patterns, used to make the sand castings, for the top handles of this 1875 tool.
I have had several people ask about 1875 markings through the years. I had trouble convincing them there were no tools marked 1875. The only mention of 1875 is on the top of the original boxes. The Box says, "Improved October 1875." That is why Collectors call these the 1875 tool.
They made that first October 20, 1874 patented tool, then kept selling it after the tool was improved to this later type. Probably to use up their stock of the earlier tool. There was a financial panic at the time. Saving money was important.
Below, you see the Improved version of Winchester's Reloading Tool. There was a big one and a little one. The small tools are much more common. The large tool you see here, loads 45-70 Government cartridges, with the 405 grain bullet. If you read the page about the Winchester 1875 Reloading Tool, you will see this large size tool pictured in Winchester Catalogs, along with the earlier 1874 tool. Winchester may have made this large tool first. Catalogs do not illustrate the small 1875 tool until later.

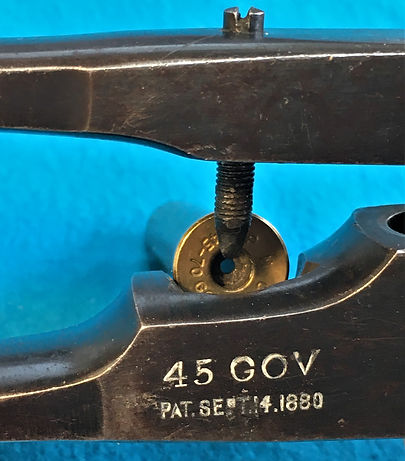
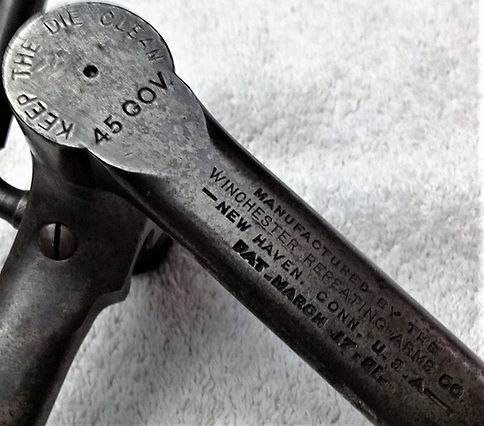
Below, you can see the cast in patent date. It was not a good idea to cast these in, because they are seldom clear. Caliber markings are always stamped in.
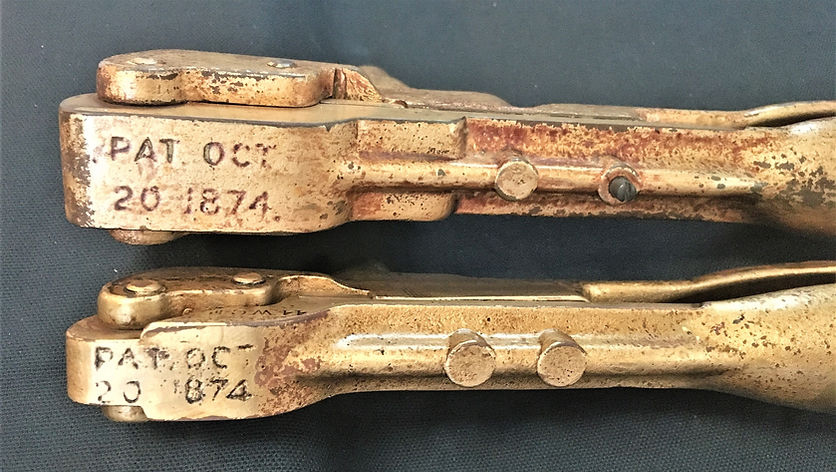
Below is an image of the Large Size 1875 Reloading Tool. Notice the GOV.45 marking. If you study, or know some about cartridges, you know this means 45-70. This marking tells you much more than that! This marking tells you specifically which bullet is to be used in this tool. A bullet cast in a Winchester Bullet Mold that is marked GOV. 45. The bullet would be the 405 grain type used in the 45-55 Carbine and 45-70 Frankford Arsenal Rifle cartridges. The seating chamber is shaped inside Just for that bullet.
_JPG.jpg)
1
2
3
4
The early model 1875 reloading tools were designed to reload both Berdan and American Style primers. They were supplied with a de-capping pin for American style primers, with a central flash hole. It also had a built in chisel to remove Berdan Primers.
(Again, there is no such thing as a boxer primer. That is a Mistake from some past writer. The primer we use today is Winchesters Patent No. 152936, July 14, 1874, and is little changed to date.)
No.1, The angled groove to hold the cartridge case when removing a Berdan primer.
No.2, The slotted top of the chisel, which pierces the Berdan Primer. You poke a hole in the primer and pry it out.
No.3, The hole to press new primers in is located here.
No.4, The Bullet seating Chamber.
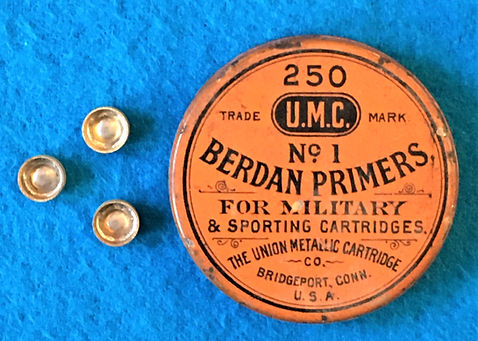
Modern collectors seem to have no knowledge of what our Ancestors did with cartridges and primers. I run into the same thing over and over at Gun Shows. Collectors buy rifles, but know nothing about what Grandpa shot through them! Here are pictures of the Berdan primer.
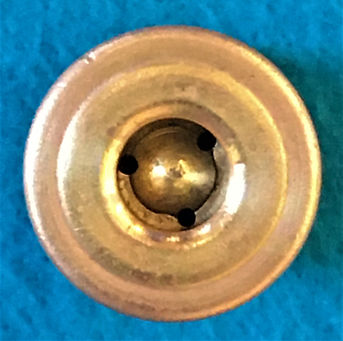
Check out the image above left. This is a 50-70 cartridge I picked up out in the desert. It is probably a U.M.C. cartridge case. I put it in CLR cleaner and shined it up with steel wool. When I poked the primer with an awl, it crumbled. The brass seems great. Notice the three flash holes under the primer and through to the inside of the cartridge case. The raised area in the center of the flash holes is the Anvil.
Above right is a primer tin from U.M.C. This is a later tin with the painted top. Early tins had a glued on paper label. These Berdan primers are basically a Wide, Flat percussion cap. (.250 diameter vs. .210 diameter for modern American primers.) There is no Anvil in the primer.
On early primer tins these were often called "Percussion Caps for Centerfire Fire Cartridges." In the end, these were called primers. Probably to avoid confusion.
These primers were very popular with Long Range Target Shooters. They were also offered in Shotgun Cartridges. ( Check out my Remington Capping Tool Page.)
Winchester knew it was important to offer a Reloading Tool which would Re and De-cap these important and popular primers.
Both the Small and Large 1875 Reloading Tools had a Berdan Chisel in the handle. After a while this Berdan chisel was phased out as the Winchester Patent primer gained in popularity. There was still demand for the Berdan Primer. Later tools still incorporated the Berdan Chisels in some models.


Above left is a 45-70 cartridge case lying in the angled slot for removing Berdan primers. There is a lot of wiggle room around the cartridge case. That is on purpose. You pierce the primer with the chisel, on the top edge. Then push down and up on the cartridge case, to pry out the primer. The Berdan primer is thinner and wider than our primers now. They are easier to remove.
To the right, you can see the chisel tip coming down on the primer pocket. You would hold the tool in your right hand and the cartridge case in the left. Pierce the edge of the primer, squeeze down gently and twist. This actually works very well if the chisel is adjusted correctly.


Above left you see the 45-70 brass case in position to press in the primer. The tool is designed to seat Berdan or American Primers.
On the right, you see the extractor pulling the cartridge case out of the Bullet Seating Chamber. The extractor lifts the cartridge case about 1/2 inch in this tool. This is important. These 1875 tools are designed to size down the neck of the cartridge case and then crimp the bullet in place. A strong extractor is needed to pull the case out.
Chamber sizes vary a lot in the old rifles. When a cartridge is fired, the cartridge case swells to fit the chamber. That means the case will line up straight in the chamber every time. Squeezing down the neck and crimping works great. Even on a straight case. The process lines up the bullet with the bore and makes it stay where you put it. Modern target shooters still do this today. They leave the cartridge full size to fit the chamber and neck size only.
_JPG.jpg)
1
2
3
4
5
I have always been curious. What do these tools look like inside that seating chamber? You can't tell much just looking in with a light. I bought this rubber molding material just to answer my questions. It is expensive, but it makes an exact impression of the inside of the bullet seating chamber. It is also easy to remove and will not harm the tool.
This is a casting of the bullet seating chamber, of the Large 1875 reloading tool you see in the photos above. I learned a lot.
The Mechanics, ( Engineers) working in the early gun companies, got it right from the beginning. They did basically the same things we do today.
No 1, This is the vent hole in the end of the bullet seating chamber. This prevents suction from forming in there. Usually grease squeezes out and has to be cleaned out occasionally. The hole also gives you a way to reach the bullet if it gets stuck in there.
No 2, This part of the bullet seating chamber is shaped the same as the 405 grain Government bullet nose. This lines the bullet up while being crimped.
No 3, The shoulder here does two things. It squeezes down the case neck to hold the bullet straight. The angle on the right end of this shoulder crimps the bullet in place. Shoulder No. 3 is short, compared to other tools I have here. It is only 1/8th of an inch long.
No. 4 & 5, These two areas in the chamber are slightly larger than the cartridge case. All they do is line everything up.

I made a casting of the Small size 44-40 tool shown above. This little tool is pretty nice inside. Every little bump you see on the rubber molding is a pit or casting flaw in the bullet seating chamber. This molded rubber casting is super accurate!
This casting looks just like a loaded 44-40 cartridge. You can see the flat nose bullet, the cartridge neck and the crimp at the case mouth clearly
The very small size of the 44 W.C.F. cartridge made it easier to size the case, even in the small tool.
These are excellent reloading tools. Winchester made the large size reloading tool in this 1875 style until September 14, 1880. On this date there was a new patent issued. If there were large sized 1875 tools still in stock they were probably sold off at a discount to dealers.
The small size tools probably remained the same until November 7, 1882. At that time, a new patent was issued and a new tool was introduced.
The Winchester Model 1880 Reloading Tool
The 1880 Reloading tool was the next step in Winchester's quest for the perfect Reloading tool.
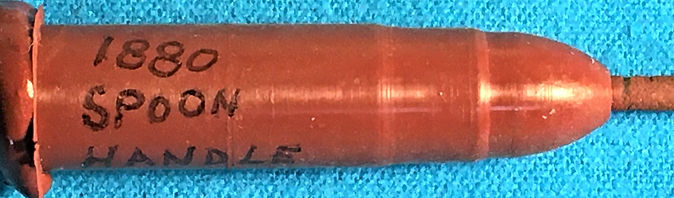
At first glance there does not seem to be a lot of difference between the 1875 and 1880 Reloading tools. The first 1880 tools had the spoon shaped handles. They were polished and blued nicely rather than painted gold. Later tools had long slender handles. You can identify the 1880 tool easily by the Big double extractor.
A really large, heavy, double hook Extractor for the Bullet Seating Chamber is a puzzle. In "Reloading Tools of the Black Powder Era", they mention these were for larger calibers. That seems to be the reason for the changes in the tool. Why did Winchester need this change? That seems to be the only Big difference between this tool and the 1875 tool. I decided my rubber chamber castings might offer a clue.
In some, but not all cases, the Bullet Seating Chamber was different from the earlier 1875 tool. Some chambers sized the neck further back along the length of the cartridges. Sizing the neck further back required more force. You had to push the case further in and pull it out.
_JPG.jpg)
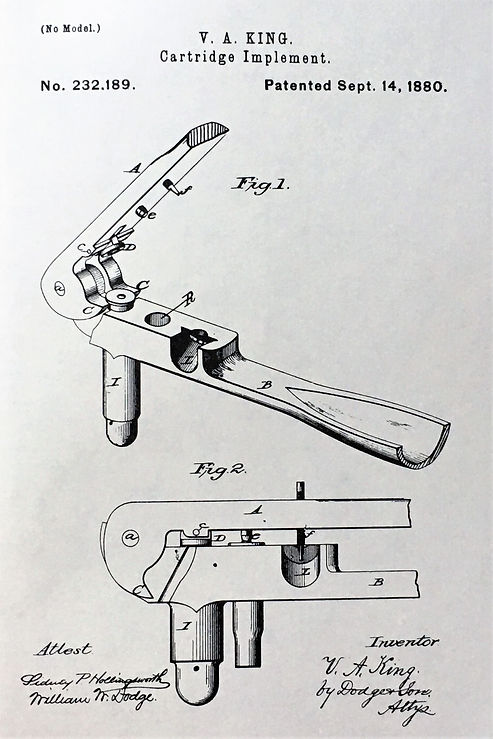
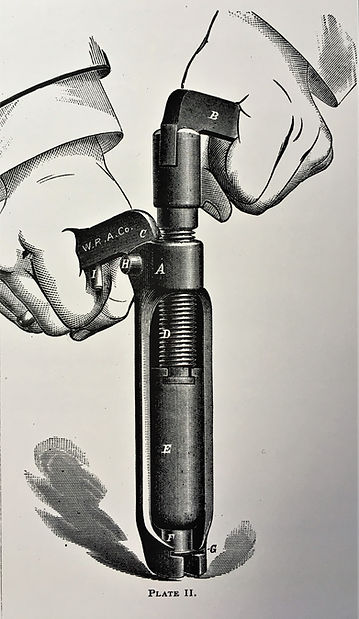
Above left is the September 14, 1880 Patent by V. A. King. The patent drawing clearly shows the big extractor hooks. The patent drawing is so good you can see all the parts of the tool. The angled slot for removing Berdan primers. (L) The Berdan chisel above it. (f) The Hole for pushing in new primers. (R) The Bullet Seating Chamber. ( T) The big hooked shaped Extractor removing a cartridge case. (C)
Above right is my 50-70 Model 1880 tool. It is not a perfect example, but it has a great Bullet Seating Chamber. Originally it had bright polished blue, much like the barrel on a Winchester Rifle. Now it has turned brown some. In "Reloading Tools of the Black Powder Era", Volume 2, page 143, they call this the First Variation. It is stamped with the caliber, but there is no Winchester company marking. I am very happy with this tool because it is the earliest type, in a caliber I like. Most of these look like they hammered in railroad spikes with them, then threw them in a fire! If you have a nice one, be happy!


Above left, you can see the thick, heavy, spoon shaped handle of this first type tool. All of these are polished well, all over, before bluing. The inside of the spoon on this early tool is not polished. Some later tools may be. This is a Big, Heavy Duty Tool, for Big Cartridges. Do not drop it on your big toe!
Above right, you can see the pin for pushing in Berdan or Winchester primers. There is a swiveling button to push the cartridge into the Bullet Seating Chamber. The hole in the center of the button protects the primer. You do not want the cartridge to explode while sizing and seating the bullet. This is also a good view of the big hook extractors.

Here are a couple more views of the first type 1880 Reloading Tool. If you are taking an afternoon stroll through a Gun Show, these are easy to spot from a distance.

If I do spot one of these from a distance, I always stop and look. They are always marked with an interesting, early, caliber. I check condition and price!
This is where the Reloading Tool Books stop! "This is what it looks like, Go Get It!"
This is the Reloading tool I used, when I first got the rubber casting material. I had always noticed pictures of 50-70 cartridges in the old catalogs. They often looked like bottleneck cartridges. I also had a really nice, early, Remington Rolling Block Sporting Rifle. It was 50-70 and had a Way, Way, oversize chamber. That was always a puzzle. Why? This tool produces the odd looking 50-70 cartridge, with a shoulder like a bottleneck cartridge. Everyone knows the 50-70 is a straight case!

_edited.png)
The top image was cast in my 1880 Reloading tool show above. The Bullet seating Chamber sizes down the neck of the cartridge for about 3/8 of an inch. The middle image is from an 1876 Winchester catalog. The lower image is from a Remington Catalog. I find it interesting that this bottleneck shape is repeated over and over. I thought it was a mistake by the engravers that made images for the catalogs.
Winchester and Remington made cartridges for the commercial market. The cartridges had to fit all the 50-70 rifles out there. The 50-70 Springfield Trapdoor rifles may have had wildly oversize chambers. That is not unusual in early military rifles.
New cartridges were probably made small to fit even the smallest chambers. If you fire a new cartridge in a small chamber you are fine. If you fire a new cartridge in an oversize chamber, the standard bullet will be a loose fit. If you are out hunting buffalo, you can't have your bullets falling out! The 1880 Reloading tool solved the problem. Size the neck only. The fired cartridge fits your chamber. The sized down neck holds the bullet tight and lines it up with the bore.
The 1880 Tool With Small Handles
After Winchester made the 1880 tool for a while, they decided to make a smaller, more compact tool. This tool looks a lot like the next tool I will describe, the Model 1882. The new design still used the Big Hook style extractors and was stamped with the 1880 patent date. They were also made in big calibers.

Both the early and late 1880 tools are attractive. You can see the Hook Extractors and the Berdan chisel. Many Riflemen still thought the Berdan primer was best.
This particular tool has 4 extra vent holes in the Bullet Seating Chamber. You can see them in the picture above, where the bullet rests in the chamber. Scroll back up to the 1880 Patent and you will see a hole on both drawings. You will not see these vent holes on many tools of this model. They were intended to let bullet lubricant escape. The Frankford Arsenal and Winchester 405 grain bullets had big grease grooves. Excess bullet lubricant may have been a problem for this caliber.

Above left is a 45-70 case sitting in the Berdan de-capping groove. You can see the extra space around the case just like the earlier tool and the Patent drawing.
On the right, I placed a cartridge case with a modern American primer, in the groove. I had no 45-70 Berdan cases available for the picture. You can see the decapping chisel coming down on the primer hole.
Someone wiped chalk or paint into the Patent dates. This happened a lot. The patent stamping of September 14, 1880 is the same as on the Patent drawing. No new Patent was filed for this tool.


The image on the left looks much like the earlier 1880 tool. No real changes here. The tool is slimmer and trimmer than it's predecessor.
I did get the de-capping pin with this tool. They are usually lost. Reproduction de-capping pins are almost never marked with the proper stamps. Fakers usually only have modern block letter stamps. Beware! The old stamping tools were much different and usually hand cut. Notice the 5 in 45G on this pin. The 5 has a tail that sticks out to the left. It is similar, but not the same as the 5 on the Reloading tool. Modern block stamps do not have that.
This pin was cleaned a little but I am glad to have it. You can see the same shape of the 405 grain bullet on the end of the de-capping pin. This was meant to fit down into the Bullet Seating Chamber. Drop the case in on the pin. Close the handles and squeeze. This should pop out the primer on an American primer. There is one flaw. If the pin does not go into the center flash hole, you can break the pin. Be careful!

1
2
3
Here is the fun part. A cast of the Bullet Seating Chamber. There are a lot of venting holes around the bullet! Turn it up-right and it looks like a space helmet from a cartoon!
The casting material caught good impressions of the side vent holes. It also shows some rough machining in the Bullet Seating Chamber. As an old time machinist, I am familiar with metal cutting. Castings of steel can be difficult metal to cut. The metal seems "Gummy" in some cases. It builds up on the cutter edge and rips rather than cutting. That is what happened here.
No. 1, The bullet has the regular vent hole on the end and four extra vent holes just in front of the case mouth. Bullet lubricant can still build up a little. Most will go out the holes.
No. 2, This is the area where the cartridge case neck is sized or squeezed down to fit the bullet. This particular tool only sizes about 1/4 of an inch. Shorter than the early 1880 tool above.
No. 3, This long shoulder is larger than the cartridge case by just a little. It shows some rough machining on it's surface. This does not matter. The left end serves to line up the cartridge, The right end has a small taper. That needs to be smooth to squeeze down the neck of the cartridge.
Yes, the 45-70 is a straight case just like the 50-70. Modern reloading dies full length resize the cartridge case. This is not necessary and shortens the life of the case. A loose fitting cartridge case lies on the bottom of the chamber. It does not line up with the bore. Neck sizing lines everything up. Winchester had a great idea here, 140 years ago. If you reload some cartridges with an original tool and your rifle shoots a smaller group? Don't be surprised!

Winchester made one more change in these later 1880 Reloading Tools. They offered an adjustable bullet seating chamber. This 45-90 tool is a good example of the genuine item. You will see gunsmith alterations of these as well, so take a good look at this one.
The tool illustrated above this one was marked 45 GOV. That means the bullet seating chamber was reamed out to seat ONLY the 405 grain bullet to the proper depth and crimp it in place. An adjustable seating chamber allowed the Rifleman to load different size bullets.
In most cases this would not work for repeating rifles. They had to have a cartridge of a specific length, to feed through the repeating action. The bullet had to be crimped in place to withstand the shock of recoil when sitting in the magazine. Winchester offered only one bullet mold for the reloading tools with a fixed seating chamber. A standard size bullet for that particular tool.
These adjustable seating dies were intended for Single Shot rifles. In them, you could use any size bullet you wanted.
The Winchester 1882 Reloading Tool
By 1882, Winchester's cartridge production had become a very large business. They were making everything from small pistol cartridges, to the largest big game ammunition. They adapted their Reloading Tool production to accommodate all these different size cartridges.
The 1882 Reloading Tool was basically a slim, trim, version of the small 1875 reloading tool. The extractor over the bullet seating chamber is just like the 1874 and 1875 tools. Everything else is located in the same place and does the same thing. The tool is polished nicely and blued.
The image below and right is interesting. First you see the Oct. 20, 1874 patent date of William Wirt Winchester. Then you see the patent of J. H. Barlow, Nov.7, 1882. This Barlow patent is not for this reloading tool.
It is for a Cartridge Case Flaring Tool.
Winchester thought the 1874 patent covered the 1882 tool just fine.
Barlow described his reason for this 1882 patent. If you put a heavy crimp on a cartridge case, firing the cartridge will not always straighten it out. Some way was needed to flare the cartridge case mouth, or the new bullet would be damaged, when reloading the cartridge.
This is not really a new reloading tool. There were a few cosmetic changes and a new de-capping pin to flare the case mouth.
The new pin caused misery for collectors. These de-capping pins stuck in the cartridge case. Grandpa would often bang the base of the cartridge on the side of the tool, denting the heck out of it with the pin. This banging would often bend or damage the small pin. Not Good. If you see little dents all over the side of your rare reloading tool, Mr. Barlow caused them.
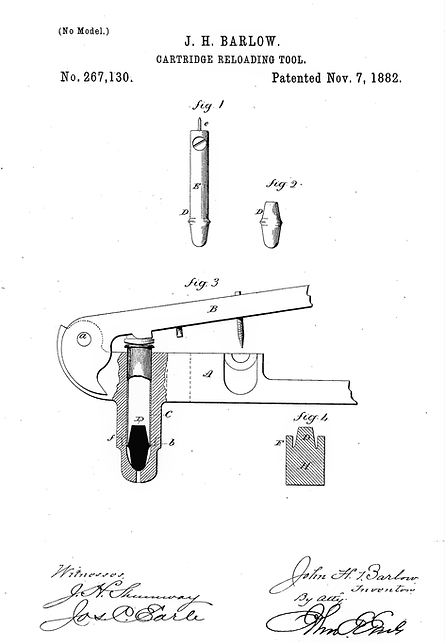

This is a perfect example of why I like to find the patent images and check them out. This tells me there was no 1882 Reloading Tool Patent.
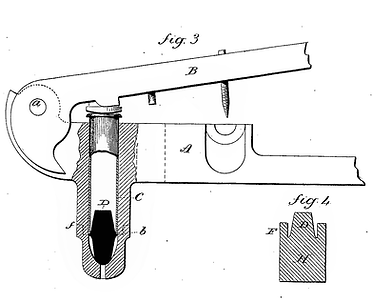
(1) The de-capping pin we are all familiar with is illustrated in Figure 1. The pin has a bump on it which is intended to flare the case mouth. That is what this patent is all about. This de-capping pin could flare the mouth of a cartridge case with the regular American primer.
(2) Figure 2 shows a peanut sized tool that could be dropped into the bullet seating chamber. With this tool you could squeeze the case down on the tapered bump and flare the Berdan cartridge cases.
(3) Drawing 3 shows how the small flaring tool works in an 1880 tool. He mentions this tool being inserted from the bottom of the bullet seating chamber.
(4) Figure 4 shows a different design of flaring tool. Barlow thought this tool could be used by itself to flare the case mouth.
There were probably examples of these tools made. I have never seen one. It is possible there are still a few around. Berdan primed cartridges were once very popular. Check out your junk boxes. I would sure like to see one of these!

This is the most common 1882 type tool. It is the final Winchester tool for small cartridges and was produced right up to the end of tool production. It has a fixed bullet seating chamber. These work exactly the same as the 1875 gold painted tool shown earlier on this page. This is a small box that held only this tool, a de-capping pin and a powder measure. You could also buy these with a proper bullet mold, all in a larger box.


You can see the really nice polishing and blue in these closeups. Every one of these tools originally had the Barlow patent de-capping pin. Since they were not attached to the tool, they are easily lost.

This is the 1882 Reloading Tool with an adjustable bullet seating chamber. This tool is intended to reload paper patch bullets. Otherwise it is much the same as the little 32 S&W tool shown above.
Zoom in on the patent date and you will see a bunch of little round dents. These were made by the tip of the regular de-capping pin. When the pin stuck in the case, this was a convenient place to knock it out.
Some of the Reloading Tool Books say there are two sizes of this 1882 model tool. I have checked around and cannot find two sizes. So far, all these tools have exactly the same size handles. Even the big 45 caliber Sharps cartridges are the same. I am thinking people are confusing the 1880 tool with the 1882 tool. I'll keep looking. If you have a larger one please send pictures with a small tool beside it.
There are so many variations of the 1882 tool that I will have to make a page just for this tool.
This tool was made in dozens of calibers. Small, medium and large. It was the most adaptable tool in the Winchester line. Like earlier tools it was not powerful enough to full length resize most cartridges. Tools for that were developed later.
I do intend to make some rubber castings of these smaller bullet seating chambers. Cartridges like the 32 S&W above were very small. It might have been possible to full length size them with these tools.
The Winchester 1888 Reloading Tool
Winchester Rifle production changed through the years. First they produced the 1873 Rifle. The Model 1873 was basically a repeating rifle that fired bottleneck shaped Pistol Sized cartridges. These little cartridges were weak, with very small Black Powder charges. The small charges and bullets did not expand the brass cartridge cases much. Full length resizing the cartridge cases was not necessary. You could force the cartridges in with the lever.
Customer demand for a more powerful Repeating Rifle was probably constant. Winchester answered with the larger framed Model 1876 in 45-75 caliber. These bigger rifles still used the weak toggle link action of the 1873. The 45-75 and other cartridges were still short bottleneck cartridges with small bullets. People seldom shoot these rifles because of high value or bad condition. The 45-75 is reported to use a .457 bullet. Winchester told the truth about that? The 75 grain powder charge was probably a wild exaggeration. The cartridge case was only 1.890 long, compared to the 45-70 Springfield at 2.100 inches. It probably only held 55 or 60 grains of powder. Less with solid head cases.
Single Shot rifles usually had some way to help push in a tight fitting cartridge. The Single Shot shooters wanted a close fitting cartridge for accuracy. Repeating rifles needed cartridges that went in easily to fire a bunch of cartridges fast. Winchester probably had some complaints about tight cartridges and difficult feeding in their Repeating Rifles early on.
The 1888 Reloading tool was Winchester's first attempt at full length resizing. The Browning Designed Model 1886 Winchester had been introduced two years earlier. The longer cartridge cases probably made full length resizing necessary. Then the cartridges would feed into the chamber easily.

_JPG.jpg)
This tool was probably only made from January 24, 1888 until March of 1891. I think I have had 5 or 6 through the years. They were all in early cartridges for the 1886 Winchester Rifle or for cartridges for the Model 1876. R. H. Chamberlain Mentions them on page 14 of "Early Loading Tools and Bullet Molds." He mentions they were Black Japanned, or Black Painted. I have not seen that. In a "Shooting and Fishing" ad Winchester says these were Forged, with no cast or Malleable iron being used. Than makes sense. All of these I have had were really smooth and hard on the outside of the body and levers. All seemed to have traces of thin bluing. Above right is the best tool I have seen. I get the impression that if you rubbed the blue with fine steel wool it would come right off.
Another "Shooting and Fishing" ad says they were made in 45-70-405, 45-70-500, 45-90, 40-82, 40-65, 38-56, 38-55, 32-40 and 50-110 express. This was just one ad. I have also seen dies marked 45-75, 45-60 and 50-95. Chamberlain calls these a scarce tool. I see fewer of these than any other tool. Collectors seem to have little interest in them. That was also a problem with the Old Time Shooters. They did not sell well.

"Shooting and Fishing" published a really nice drawing. You primed the cartridge, then charged the case and started the bullet. Then you would push it all together into the die. Spinning lever (B) would force the cartridge (F) into the die and full length size the cartridge. The screw (D) provided the pressure to push the cartridge in and pull out the finished cartridge.
Above right shows the hole for seating the primer. You would remove the die, and turn the screw out of the way. Lever (C) has a pin on it to push the primer in.
I had one of these for a while that had a piece of angle iron welded to it, for bolting to a bench. That may have helped. I never tried it.
These are very heavy. The levers flop around and the die can fall out. They are hard to handle.
Winchester moved on in 1891!
The Winchester 1891 Reloading Tool
This was another odd attempt to produce a reloading tool that would full length resize cartridge cases as they were being reloaded. I have to laugh every time I see one of these. I bought one of these about 40 years ago. I tried to use it. It put rings on the outside of the cartridge brass that were ugly at best. Putting the primers in went OK.
The worst part was that these things are Huge! I had the feeling that top arm could break bones if it got away from me. Now I just sell these whenever I get them.
Even Winchester must have been relieved, when they got the patent for the 1894 Reloading Tool.
After about three years these were gone!
I have to say these did work. They would full length re-size and crimp a cartridge, for a repeating Rifle of any type. These were made in 50-110, 45-90, 45-70-500, 45-70-405, 40-82, 40-65 and 38-56. These were all cartridges for the Model 1886 Winchester. They were also made in 38-55, and 32-40. Two very popular light sporting cartridges of the time. Winchester was making the Hi-Wall Single Shot, Model 1885, at the time, but I doubt many single shot shooters ordered these tools. They did not like to size and crimp their cartridges, unless they were loading cartridges for hunting accuracy only.


The de-capping pin is illustrated above left. These are normally marked with the caliber. The 1882 patent bump for flaring the case mouth is gone. That is good. The idea is to slip the cartridge case over the de-capping pin and whack it with a piece of wood, or a soft mallet. That would knock out the spent primer.
There is a slot milled into the side of the tool, upper right. This slot is for re-capping the cartridge case. The little round piece you see in the middle of the slot, is the other end of the de-capping pin. There is a quick spiral slot milled into this end of the L shaped pin. You back it off a turn, slide in a primer, then slide in the cartridge case. Turning the pin back in seats the primer. I have tried this and it works great. Holding on to the big tool is not fun.
Someone made a few reproduction pins a few years ago. They were offered on E-bay. I doubt they were profitable to make. I do not see them any more. These pins will spin right out, so they were often lost.

Winchester put the cartridge case flaring device on the bottom ring above left. You would slip the cartridge case on to the inner ring and give it a good push or twist. That would remove any left over crimp and flare the cartridge case just a bit to help insert the bullet. If you scroll back up to the 1882, J. H. Barlow patent, you will see this idea is covered by the device at the bottom right of the patent. ( Figure 4 )
It is also illustrated in the 1891 patent above.
The little ring with the arrow has a left handed thread. Opposite to the thread on the die. This would prevent it from backing out when pushing the loaded cartridge into the sizing die. The arrow indicates which way to turn it if you want to install it in the loading process. Turning it the other way removes it.
(1) The idea here is to remove the ring with the arrow.
(2) Remove the de-capping pin to get it out of the way.
(3) Turn the top handle back a few turns.
(4) Turn the tool top side up. Insert the primed cartridge. It should be loaded with the powder and have the bullet started in.
(5) Then you screw the ring with the arrow back in. This pushes the cartridge rim against a shoulder inside the tool. Remember it has a left hand thread. The ring with the arrow is supposed to be screwed all the way in to fully size the cartridge case.
(6) Now you screw the long top handle all the way down. This completely closes the die on the cartridge. It is now full length sized and crimped.
(7) Unscrewing the top handle pulls the finished cartridge out of the die.
(8) Once the cartridge is released, remove the ring with the arrow and take out the finished cartridge.
Check out the image upper right. There is a caliber stamping and a reminder to keep the sizing die clean. Riflemen of the time were not familiar with full length resizing. Winchester wanted the user to do it right.
This all works just fine, but it is not easy or convenient. The tool sold a little better than the 1888 tool but was dropped when the 1894 tool was introduced. I doubt these were popular, but you do see them fairly often.


The Winchester 1894 Reloading Tool
The October 20, 1874 Reloading Tool Patent by William Wirt Winchester was remarkable. There was nothing else like it at the time. A lot of people tried to work around this patent and make their own products in the following years. Winchester hit a home run by marketing the Model 1873 Rifle, Loaded Cartridges, Empty Cartridge Cases, Primers, Bullet Molds, Manufactured Bullets and an Excellent Reloading Tool. They were an Industry Leader and enjoyed great success. There were 720,000 Model 1873 rifles sold by 1923.
No other company equaled the diverse product sales of Winchester.
If you went through the Patents above, you will see that the original design was little changed through the years. The 1882 Reloading tool was a slim, trim, polished version of that first 1874 model tool. It was made right through to the end of Reloading Tool Production. Looking back, I think they could have kept that first design and done well. The integral de-capping pin was great. Lost de-capping pins on later tools are a pain! All they needed to do was upgrade that first tool to a slimmer version. Stronger handles made of steel and minor changes would have worked.
When John Browning came up with the 1886 Winchester action design, things changed a little. It became necessary to full-length resize these longer cartridges. This hurt accuracy, but was necessary for easy feeding in a repeating rifle. The 1888 and 1891 Winchester tools were workable, but big and clumsy. Winchester needed to come up with something better.
The 1894 Winchester Reloading Tool was a great answer. This is an elegant solution to the full length resizing problem. The tool is compact, does every function needed and is very powerful.
This patent was granted to William Mason, February 13, 1894. (Patent 514722) Mason worked for Remington, Colt and Winchester. He designed the swing out cylinder for Colt Revolvers, with a star shaped, one piece ejector. He designed the first Double action revolver, and the rare Winchester Revolver. He made working prototypes for John Browning Designs like the 1886 Winchester. He seems to have filed 125 patents over his life, for everything from firearms, to steam pumps and weaving looms. He is considered one of the most significant mechanical designers of the Nineteenth Century.
This little tool looks simple. It is really a complex design, that is elegant in it's simplicity.
I see these fairly often at even the smallest gun shows. Collectors often have no idea what they are and pay little attention. Take a closer look at this Reloading Tool. You may be surprised.


I never could find the patent drawing for this Reloading Tool. The image may never have been published. On the home page I asked for help. Special thanks to Jim Martin. He shared a copy.
If you can read mechanical drawings, this is fun to look at. You can see the basic 1894 Reloading Tool that went into production. There is one big difference. The internal parts in this drawing are all Round.
Ed Curtis thinks the original models for these tools may still be around. Norm Flayderman sold everything in the Winchester warehouse through his catalogs. I am hoping one of you collectors may still have them stashed away. We would all love to see what they look like!
The image below gives you an idea of the general construction and function of this reloading tool. Ed Curtis says it was the Best Reloading Tool Winchester ever made. I agree. Right now you can buy them for a very reasonable price. Most Winchester Collectors would not know what one was if it fell on their foot! Buy one in your favorite caliber and give it a try. They work great!

(A) Is the Bullet seating die. You can see the base of a cartridge case sticking out of the right end. It performs several other functions as well.
On the left end, there is a button that serves to expand the cartridge case mouth. Most of these dies crimp a bullet into a cartridge case. At times you have to flare the case a little to help start the bullet without damaging it.
These dies are extremely hard, much like modern dies. They have a fine polish and finish inside. They will full length resize a cartridge case and crimp the bullet in place. The finished cartridge will be shaped just like a new cartridge bought at your local hardware store.
The die also serves as a handle when seating a primer or sizing a case.
(B) This is the main body of the tool. It also performs several functions. It holds a slide. The slide is the same part that is holding the cartridge in re-capping position to the right. The slide has a spring loaded extractor on the other end, which pulls out the finished cartridge. It is activated by the curved lever.
The curved lever also acts as a cam to move the slide up or down just .030 or 30 thousandths of an inch. This provides tremendous force for pushing the cartridge case into the die and pulling it out. All in a small package. The curved lever bears on two hardened roller bearings inside the slide. One above and one below the lever. These roller bearings also increase the force and smooth operation of the lever.
Every part here has multiple functions. A tribute to William Mason's genius as a designer. No other tool maker ever came close to the quality and simplicity of this Reloading Tool.

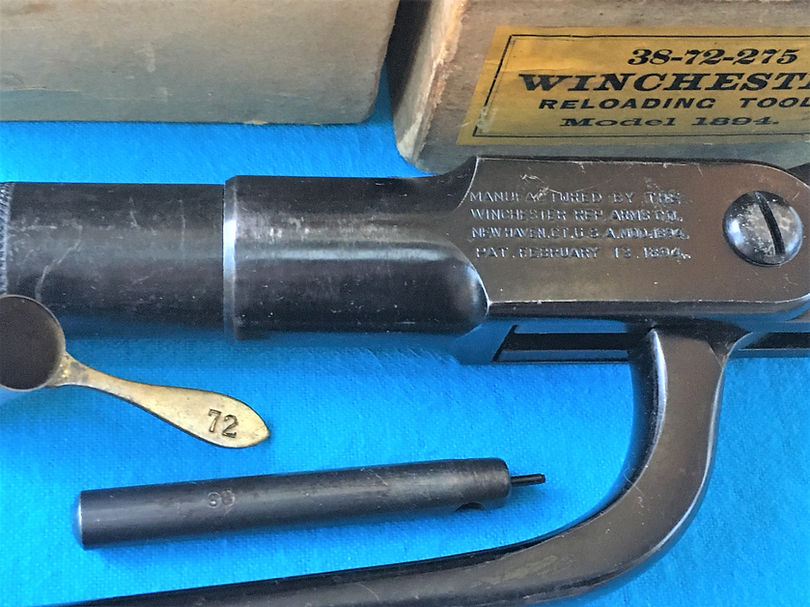
Above, you see a large size, cream colored box for the 1894 Reloading Tool. At different times these were also covered with Black paper on the outside. I think the black color is much more common. There is a paper covered wood block stapled to one end of the box. The Reloading Tool, powder dipper and de-capping pin all fit in this bottom space. There is room for a bullet mold to fit in the top of the box. You could also buy the Reloading Tool, Powder Dipper and De-capping pin in a smaller box, without the bullet mold. There are so many variations, you could build a huge collection, just of 1894 tools.
Above, you can see the end of the cream colored box with a yellow label. The cream colored boxes with the yellow label may have been produced in later production. That is a guess. It may not be 100% true.
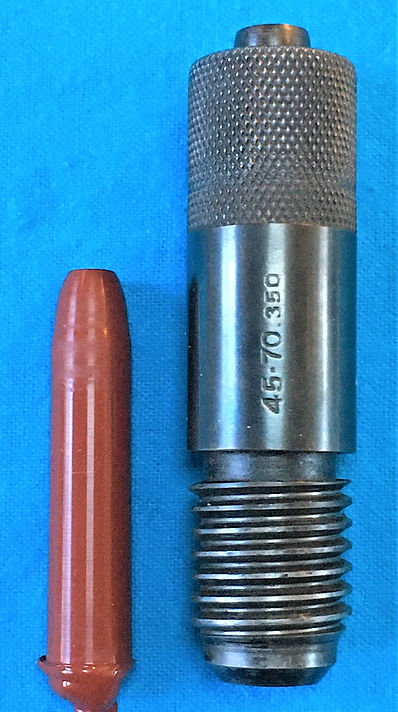
This is the proper powder dipper and the correct de-capping pin. The de-capping pin is marked with the 38 caliber. It does not have the bump, for expanding the cartridge case mouth, from the 1882 J.H. Barlow Patent. Thank goodness! These de-capping pins are not as likely to stick in a cartridge case. I seldom see little round dents in these tools from whacking the tip of the pin on the tool to loosen it.
Notice the nice polished and blued finish on this tool. Winchester made very high quality tools.

The main body of the tool has a round hole for a rigid pin. The slide below it has an elongated hole. This allows the slide to move up and down just a small amount. This up and down movement does two things. It works to push the cartridge case into the die. Then, it pulls, to remove the cartridge case from the die after sizing. The hook shaped extractor is a nice thick piece of heat treated steel. All this happens by raising and lowering the curved handle.

You can see the two rollers in the slide above. They roll on staked pins. This helps the cam-like shapes on the lever to push more easily on the base of the cartridge. This is also an outside view of the spring loaded extractor on the right end of the slide.
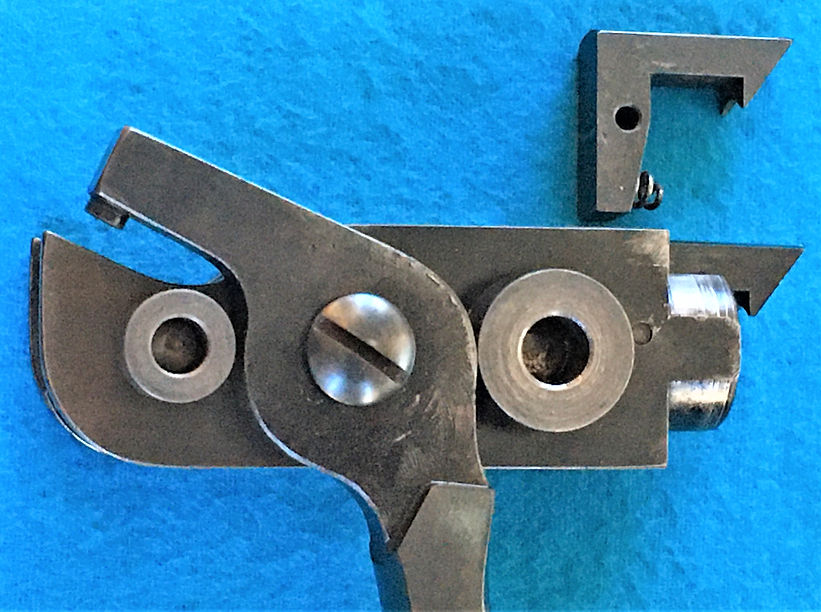
Above, I placed the rollers and lever on the outside of the slide. Without taking the tool apart, it is difficult to see just what all is going on inside this tool. If you look close at the shape of the curved lever, around the slotted screw and pin, you will see it is not round. It acts as a cam when you pull the lever up, or down. I always heard that the simplest design, is often the best design. This is a great example. The up and down movement is short, but powerful.
I suspect these parts are all steel forgings that have been heat treated. It is rare to see any wear on them. Notice that the roller on the sizing die side is a bit larger. This provides extra leverage to push the cartridge case into the die. Squeezing it down requires a good deal of force.

This is a list of the cartridges for the 1894 Reloading Tool. There are no small pistol size cartridges here. The little cartridges were loaded with the 1882 Reloading Tool.
The shortest cartridge is the 50 carbine. This is a shortened 50-70 at just 1 3/8 inches long. It is very unusual because only 300 Remington Rolling Block Cadet Rifles were ever chambered for it. Winchester made new, reloadable centerfire cartridges in this caliber from the very beginning. I think it was a light kicking cartridge for the 50 caliber Sharps carbine. The full load 50-70 in these carbines would kick the snot out of you. Why they did not offer a regular old 50-70, with a reduced powder charge and smaller bullet, is not clear. The 50 carbine was a little like the 22 short vs. the 22 long rifle. A 50-70 Short?
The smallest caliber is the 25-35. It was a long bottleneck cartridge and needed full length resizing in repeating rifles. It is basically a 30-30 W.C.F. necked down to 25 caliber. It was offered in the Model 1894 Rifle a few years after the Rifle was introduced.
Scan the list and you will see some odd and almost obsolete cartridges. Those are usually the rare ones!
If you wanted a complete collection of 1894 Reloading Tools, you would need to find these 38 different cartridges. But, there were variations in these tools as well. It might take a few years to find them!

This is a description of how to use the 1894 Tool. This came from a Winchester catalog. The picture is not very good but you can read what Winchester had to say about this new Tool. I like to add these descriptions because so few collectors are familiar with what these tools actually do.
These Model 1894 tools were different from the Ideal tools in one big way. They were never offered with an adjustable screw to seat different types and sizes of bullets. They would only load the standard bullet for the standard load. These were intended just for Winchester Lever Action Rifles or other brands of repeating rifles like Savage or Marlin. If you collect and shoot Winchester Lever Actions, this is not a problem.
You will find the dies altered by Gunsmiths. They would drill the end and add a screw. This must have been difficult. The dies are very hard. They probably softened the metal, drilled and tapped the die, then maybe re-hardened them. If you find one of these, it is doubtful Winchester did it.
If you wanted to experiment with bullets, you had to buy the 1882 reloading tool.
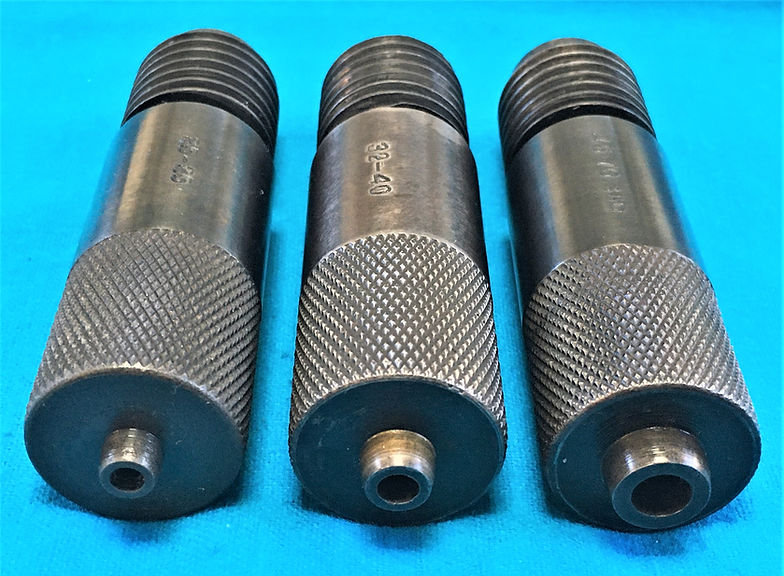
Just for fun, I took this photo of three cartridge case flaring buttons. Collectors have little knowledge of these tools. I doubt most of them know about this little detail.
From left to right, you see a 25-35 W.C.F., a 32-40 and a 45-70 die for the 350 grain Model 1886 cartridge.
These little buttons are much better than the bump Winchester put on their 1882 de-capping pins.
If there was a little bit of crimping left on an empty cartridge case mouth, these would fix it. Just push the cartridge case mouth over these buttons. Maybe give it a twist. This would open the case mouth up. Then you could easily insert a soft lead bullet without damaging the base of the bullet. This would also help get a jacketed bullet started, before you pushed the assembly into the die.


These castings can tell a lot about these Reloading Tools. Notice the glossy surface on the castings. These full length resizing dies were machined and polished. Then they were heat treated until they became extremely hard. After heat treating they were polished inside again. All to get a perfectly smooth surface in the die. This finishing allowed the cartridges to be sized down, then removed easily.
The 25-35 die is interesting. You can see a vent hole in the side of the sizing die right at the shoulder of the rubber casting. You will also see this side vent hole in the patent drawing above. The right hand patent drawing shows this hole at b#. (Figure 4 of the drawing.) It is not present in all of these dies.
This had to be done before the die was heat treated. These dies are much too hard to drill a hole later. Try to file on these with a brand new file. You will ruin the file! It will not cut. This side vent hole is not common on the 1894 Reloading Tool. The 25-35 is a necked down 30-30 or 32 special type cartridge case. The Patent description says this hole is to prevent air being trapped in the die. This may have been necessary for cartridges with a pronounced shoulder on the cartridge case.
The two Reloading Tool Dies above are designed to load a Flat Nose Bullet. Winchester offered a Bullet mold for this bullet. Winchester also offered new cast lead or jacketed bullets in this same shape. Mostly, I see boxes of 25 new bullets. The flat nose bullets were for Repeating rifles that had a Tubular Magazine. A pointed bullet was not a good idea. The point could hit the primers lined up in that tube, when the Rifle fired. This was a safety feature.

There were a lot of variations in the 1894 Reloading Tools. The die marked 40-72 seats and crimps a round nose bullet. Winchester made a Bullet Mold just for this cartridge. They also made jacketed bullets by the box. These 40-72 cartridges were designed for the Winchester Model 1895 Rifle. A flat nose bullet was not needed. In the Model 1895, the bullets are stacked vertically in a magazine under the action.
The 45-70 with the 350 grain bullet seats a flat nose bullet. This particular cartridge was for the Model 1886 Lever Action Rifle. This bullet has the flat nose that protects the primers in a tubular magazine.
Winchester Reloading Tools
Conclusion
This website page is a good example of why RELOADINGTOOL.COM is a useful new tool for the Reloading Tool Collector. This is the longest page I have produced so far. It comes no where CLOSE to covering the subject! All I was able to do here is hit the high spots.
Each of the Winchester Reloading Tools will get a page of it's own. I have started a page for the Model 1875 Reloading Tool. It is far from complete.
There are many variations of each Reloading Tool. I will never be able to get photos of all of them.
With help from All Of You, I may come close!